
How to Record Gameplay in Unity: 2 Mins Tutorial
- VOiD1 Gaming

- Jan 5, 2022
- 5 min read
Updated: Jan 19, 2022
In this quick 2-Mins Tutorial, learn how to record high-quality gameplay in Unity.

Gameplay videos are one of the most crucial elements that help to attract new users by driving their emotions to become prime members of the game community. It plays a significant role as a “first impression” towards the game converting the spectator into a niche gamer. Recording high-quality gameplay videos are pretty simple, we can use various third-party software to get the right shot directly from our build game but how about changing various settings on the fly and recording from the game engine itself? Especially, changing the visuals and adding custom settings to the gameplay video. This can be well tackled with the in-built recording directly taken from the Engine. And luckily, Unity provides a free and pretty powerful solution to record high-quality gameplay videos from the editor and also allows the user to take Animation clips, GIFs, only Audio, and a lot more. In this quick 2-Mins Tutorial Series we will be looking at recording gameplay videos from the Unity Engine that can be used for Promotions, Trailers, and a lot more other stuff.
We have used Unity’s Default Sample Scene for this tutorial, you can replicate these steps for your custom game as well.
Recording the In-Game Scene
Here are the basic steps we need to follow to record our gameplay video from the Unity Engine.
1. Let’s Begin with the Unity Default Sample Project. Open up Unity Hub and Select 2D Platformer Microgame from the Projects Panel.

2. Unity Recorder is now ready for Production and is out from the long-running Preview Tag. We can fetch it directly from the Package Manager, just open up the Package Manager from the Windows tab and search for Unity Recorder. Once you find it, just hit Install.


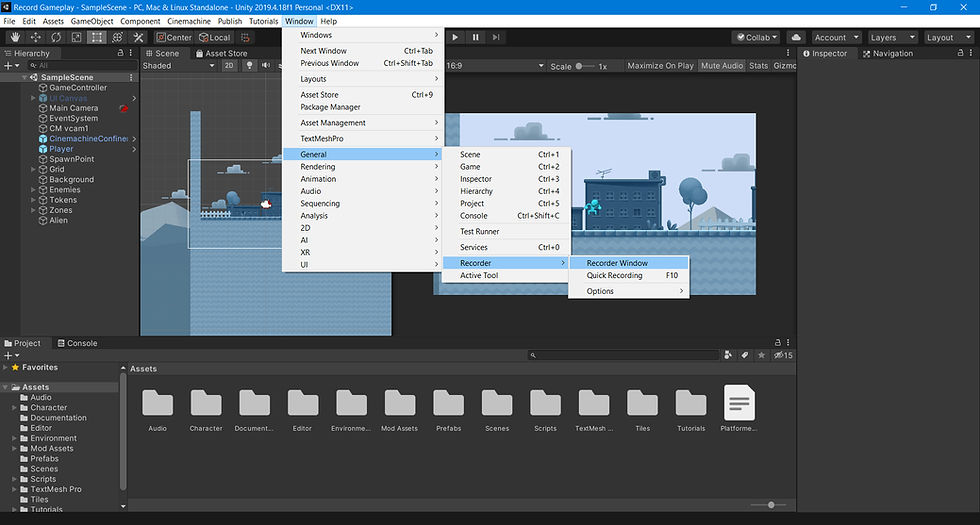
3. Once the Unity Recorder is installed successfully you can find it under the Windows Tab -> then General -> Recorder -> and Recorder Window. And this is the recording window we need for our gameplay video recording directly from the game scene.

4. There are a few options on the main Recorder screen we need to configure before we move ahead.

a. Exit Play Mode- This Boolean helps us to exit from the Play Mode automatically once we stop the recording. However, it is not mandatory to exit from the play mode every time we finish our recording as we might require to capture other shots from different parts of the game. But for this tutorial, we will keep this turned ON as we need to record the game scene only once.

b. Recording Mode- Recording Mode has 4 options to choose from, Manual, Single Frame, Frame Interval, and Time Interval (sec). Depending on the use case we can choose the mode of recording, Manual mode will give us the ability to Start and Stop the Recording anytime we want, Single Frame will just record one frame, Frame interval will record everything between the Two Frame numbers specified, and the Time interval would also record everything between the two-time interval specified. Upon choosing the Frame interval or the Time interval, Unity will stop recording the game once the end frame/ end time hits. We will choose a Time interval for our tutorial and use 0 Sec for Start and 10 Sec for End

c. Playback Speed- Playback speed helps Unity to know, whether the recorder should capture the video at constant speed/FPS or vary according to the performance of the real game. We need a constant FPS so let’s use Constant for the Playback Speed.

d. Target FPS- Once we set the Playback speed, now we need to instruct Unity to record the video at a certain FPS. Unity allows various FPS settings to choose from, but for our tutorial, we require to record it constantly in 60 FPS.

e. Cap FPS- Lastly, we set the Target FPS to 60, we can tell Unity to Cap the FPS to 60 and avoid dropping the FPS anytime. Once these settings are done, we can add one recorder from the left-hand side panel.
5. Unity gives us the ability to record and export Animation clip, Movie, Image Sequence, & Audio. We will move ahead with the option Movie as we require a short video of our gameplay. Again, depending on the use case we might choose other options for recording, for example, if we want an Animation Clip, we can choose an Animation clip and get an exported asset to use it in a different Game or send it to someone for polishing, likewise, we can export Image Sequence to work as a GIF and can also export only Audio for other purposes.

6. Once we add Movie option as a recorder, there are 3 main Sections, Capture, Format, and Output File. This is pretty straight Forward, Capture needs a Source to record, Format needs a format to be exported, and lastly the Output File requires a name and location to save.
a. Source- Unity requires a Source Object to capture the video, the source can be anything like Game View, Targeted Camera, 360 View, Render Texture Asset, and Texture Sampling. As in our case we need Unity to capture everything that’s on the Game View, we will select Game View as our source. Other options will allow us to capture videos from various aspects of Unity as per requirement.

b. Output Resolution- We can choose the output resolution from the dropdown box. We want our game video should be Full HD so let’s select FHD 1080 as the Output Resolution. Now, we will select the general 16:9 Aspect Ratio from the list.


c. Include Audio- This “Include Audio” checkbox tells Unity to include the audio of the game in the video. We will keep it turned ON.
d. Media File Format- Now, there are 3 Media File Format options for video encoding, H.264 MP4, VP8 WebM, and ProRes QuickTime. Our requirement is MP4 video, so let's choose that and move ahead.

e. Quality- We can choose different quality settings here as per the needs. We will go with the default High-Quality Settings for now.

f. File Name- Lastly, we need output and for that, we have to specify the name of the file that is to be exported. We will use the default name.
g. Path- By default Unity stores this under the project, however, we can change it to any of the locations we want. Unity gives us various options to choose from the list of locations, for example, Project, Asset Folder, Streaming Assets, Persistent Data, Temporary Cache, and Absolute location. For this tutorial let’s save this in a different location. Choose Absolute from the list, and hit the 3-small dots, and select the location you want to save.
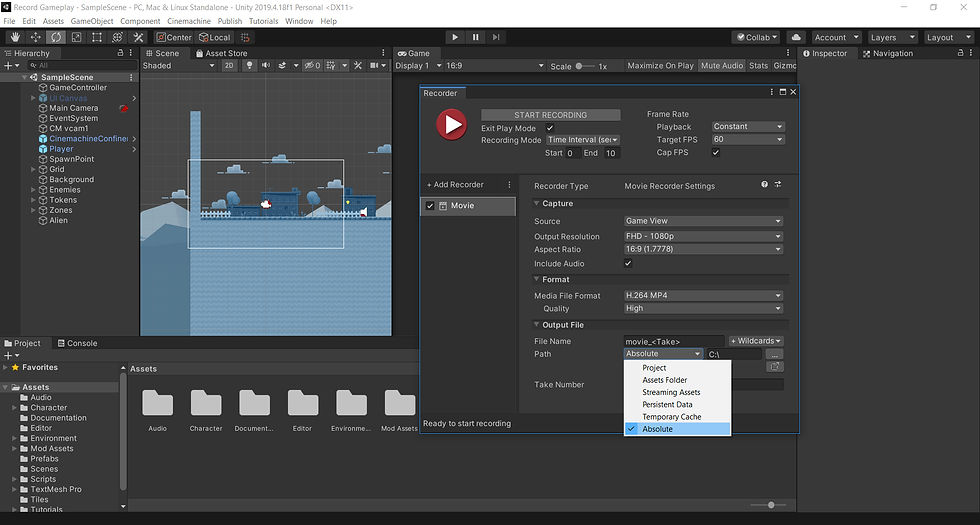
h. Take Number- Take number is an automatic Suffix assigned to the file name by Unity to avoid name conflicts, video override/replacement. In this way, we even don’t require to rename the file with the numbering for every shot we take. That’s all we want, now let’s record some clips.

7. To record a clip, just hit the Start Recording button on the Recorder Window and Unity will automatically play your game while on the recording mode. As we have used Time Interval for 10 sec as Recording Mode, our recorder will stop recording the gameplay once 10 sec is reached. We can also track the progress of recording from the Progress Bar Shown in the downside of the Recorder Window.

8. Finally, let’s check our recorded video, locate the path specified on the recording window and you will see your gameplay footage ready to view.


That’s all for today’s quick 2 Mins Tutorial Series. We have captured our first ever Gameplay Video inside Unity using the Unity Recorder. We will be back with another such interesting short tutorial, till then, Stay Tuned and Never Miss Out on an Opportunity to Learn More.
With Love From VOiD1 Gaming

**VOiD1 Gaming is not sponsored by the above company. The trademarks appearing in this article are registered trademarks of the respective company.**


Comments